
 Healthcare App Development Services
 Real Estate Web Development Services
 E-Commerce App Development Services
 E-Commerce Web Development Services
 Blockchain E-commerce Development Company
 Fintech App Development Services
 Fintech Web Development
 Blockchain Fintech Development Company
 E-Learning App Development Services
 Restaurant App Development Company
 Mobile Game Development Company
 Travel App Development Company
 Automotive Web Design
 AI Traffic Management System
 AI Inventory Management Software
 AI Software Development
  AI Development Company
  AI App Development Services
  ChatGPT integration services
  AI Integration Services
  Generative AI Development Services
  Natural Language Processing Company
 Machine Learning Development
  Machine learning consulting services
  Blockchain Development
  Blockchain Software Development
  Smart Contract Development Company
  NFT Marketplace Development Services
  Asset Tokenization Company
 DeFi Wallet Development Company
 Mobile App Development
  IOS App Development
  Android App Development
  Cross-Platform App Development
  Augmented Reality (AR) App Development
  Virtual Reality (VR) App Development
  Web App Development
  SaaS App Development
 Flutter
  React Native
  Swift (IOS)
  Kotlin (Android)
  Mean Stack Development
  AngularJS Development
  MongoDB Development
  Nodejs Development
  Database Development
 Ruby on Rails Development
 Expressjs Development
  Full Stack Development
  Web Development Services
  Laravel Development
  LAMP Development
  Custom PHP Development
  .Net Development
  User Experience Design Services
  User Interface Design Services
  Automated Testing
  Manual Testing
  Digital Marketing Services
 Ride-Sharing And Taxi Services
 Food Delivery Services
 Grocery Delivery Services
 Transportation And Logistics
 Car Wash App
 Home Services App
 ERP Development Services
 CMS Development Services
 LMS Development
 CRM Development
 DevOps Development Services
 AI Business Solutions
 AI Cloud Solutions
 AI Chatbot Development
 API Development
 Blockchain Product Development
 Cryptocurrency Wallet Development
 About Talentelgia
  Our Team
  Our Culture
 Healthcare App Development Services
 Real Estate Web Development Services
 E-Commerce App Development Services
 E-Commerce Web Development Services
 Blockchain E-commerce
Development Company
Blockchain E-commerce
Development Company Fintech App Development Services
 Finance Web Development
 Blockchain Fintech
Development Company
Blockchain Fintech
Development Company E-Learning App Development Services
 Restaurant App Development Company
 Mobile Game Development Company
 Travel App Development Company
 Automotive Web Design
 AI Traffic Management System
 AI Inventory Management Software
 AI Software Development
 AI Development Company
 ChatGPT integration services
 AI Integration Services
 Machine Learning Development
 Machine learning consulting services
 Blockchain Development
 Blockchain Software Development
 Smart contract development company
 NFT marketplace development services
 IOS App Development
 Android App Development
 Cross-Platform App Development
 Augmented Reality (AR) App
Development
Augmented Reality (AR) App
Development Virtual Reality (VR) App Development
 Web App Development
 Flutter
 React
Native
React
Native Swift
(IOS)
Swift
(IOS) Kotlin (Android)
 MEAN Stack Development
 AngularJS Development
 MongoDB Development
 Nodejs Development
 Database development services
 Ruby on Rails Development services
 Expressjs Development
 Full Stack Development
 Web Development Services
 Laravel Development
 LAMP
Development
LAMP
Development Custom PHP Development
 User Experience Design Services
 User Interface Design Services
 Automated Testing
 Manual
Testing
Manual
Testing About Talentelgia
 Our Team
 Our Culture
What does it take to build a web app from scratch that is usable, reliable, and works? Internal projects, customer engagement projects, or the next big product, whether large or small, creating a web application involves more than just frontend and backend coding. It all begins with an idea and considerations about tech stack, feature set, user experience, and scalability. ” Without a sort of system, it’s easy to get lost, or to perform actions that are much too difficult.
In this blog, we will guide you through the process of creating a web app from scratch, step by step. We’ll go from planning and wireframing, making decisions on web app development frameworks, writing clean code, testing, and deploying all in the real world. Whether you’re working solo or as part of a team, this guide will help you navigate from idea to launch with clarity and confidence. Let’s get started:
What Is A Web Application?
A web application (also known as a web app) is essentially a computer software program that performs function(s) on a remote server and is conveyed via the internet through a web-based browser interface. And unlike desktop apps, which you install on your computer, web apps work right in your browser — across any device, be it your phone, tablet, or desktop.
Web apps get constructed for all sorts of things. Some of the popular examples are email services such as Gmail, online calculators, e-commerce websites, and social media applications. Some web apps, particularly homegrown ones, are optimized for a particular browser, but most are built to work well with any of the main browsers.
Web Application Vs Website
A web application is a website, but a website is not necessarily a web application. Web applications are dynamic; they can accept input or data from the people using them, and people can interact with them and perform tasks. Websites, on the other hand, are primarily informational, which is to say that we go to them to read or view things but don’t interact with those things in any meaningful way other than, say, clicking some links or pressing the down key.
| Feature | Website | Web Application |
| Purpose | Mainly created to inform, present, or showcase content. Examples include company websites, blogs, news portals, or portfolios. | Built to perform tasks, manage data, and enable user interaction. Examples include Gmail, Trello, Facebook, and online banking. |
| User Interaction | Interaction is mostly passive—visitors read, browse, or consume content. | Interaction is active and task-oriented—users create, edit, update, and delete data in real time. |
| Examples | News sites, blogs, e-commerce product catalogs, and portfolios. | Gmail, Google Docs, Trello, Slack, LinkedIn, and online banking dashboards. |
| Complexity | Relatively simple in structure—can be static or lightly dynamic (occasional updates). | More complex, often requiring backend logic, databases, authentication, and APIs. |
| Login Required | Usually not required (unless for admin updates or gated content). | Often mandatory since apps are personalized and tied to user accounts. |
| Content Type | Static or semi-dynamic: information is the same for most users (e.g., blog post, company info). | Dynamic and personalized: content changes depending on the user (e.g., your emails, your Trello boards). |
| Development Focus | Focuses more on design, aesthetics, and content presentation. | Focuses on functionality, workflows, performance, and user experience. |
| Technologies Used | Basic stack: HTML, CSS, and JavaScript (possibly CMS like WordPress, Wix). | Full-stack development: frontend frameworks (React, Angular, Vue) + backend frameworks (Node) |
Steps To Build A Web Application From Scratch
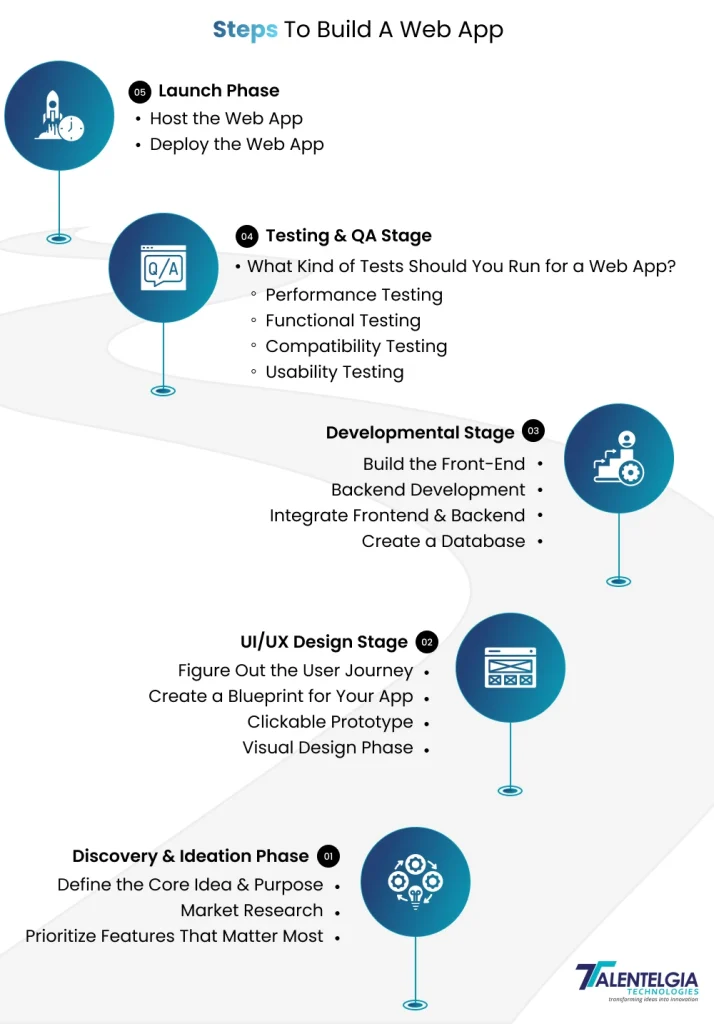
1. Discovery & Ideation Phase
The discovery and ideation stage is the first process if you are learning how to build a web app from scratch. It’s where the raw idea tumbles into the solid plan. This phase helps you describe what your app will do, who it’s for, and what real problem it solves.
- Define the core idea & purpose
Before you get started, you need to answer that latter question: What problem is my web app addressing, and why should we care?
In this stage, you:
- Collaborate with fellow teammates or stakeholders to brainstorm potential ideas.
- Describe the need for the web-app
- Focus on solving a specific kind of problem
This way, you’re not just building something that’s “neat”, you’re building a super useful product.
- Market Research
And to ensure your idea is worth building, conduct market research:
- Study competitors and their weaknesses
- Talk to potential users
- Determine actual pain points and use cases
Getting the audience picture right early can enable better design and feature decisions downstream.
- Prioritize Features That Matter Most
To ensure your idea is worth building, perform market research:
- Study competitors and their weaknesses
- Talk to potential users
- Find True Pain Points and Use Cases
The earlier you know your audience, the better decisions you can make about design and features later.
2. UI/UX Design Stage
Once you have your idea validated, the next step in learning to create a web app from scratch is UX design. The UI/UX is concerned with how users will engage with your app, what their journey will be, and how you can make that journey easy to use, intuitive, and visually appealing.
- Figure out the user journey
The user journey describes the step-by-step path your users take within your web app from their first click to achieving a goal.
- From looking at the user journey, you can:
- Know where users may become confused
- Spot friction points in navigation
- Optimize the time it takes your users to accomplish their tasks
Designing from the journey, giving you a voice for any touchpoint, ensuring each user moment is intentional and user-first.
- Create A Blueprint for your app
A web app blueprint is a floor plan for an application. It illustrates how the pages are linked, what each screen contains, and how users will move from one to the other.
This step includes:
- Creating wireframes or basic layouts
- Structuring content and interactive elements
- Matching the user journey with each tactic
Blueprinting creates development efficiency and minimizes late-stage design mistakes.
- Clickable Prototype
A clickable prototype is a functional version of your web app that simulates realistic interactions—without having to write code.
It helps you:
- See user flow in action
- Test navigation and usability
- Gather feedback before development begins
This is where teams can begin to spot and resolve UX problems ahead of time, ultimately saving time and cost-effective web app in the long run.
- Visual Design Phase
The visual design stage provides character and finesse to your web app. After the prototype is approved by the business, designers can apply a clean, branded, engaging, and necessary design to the interface.
Key tasks include:
- Selecting fonts and colors, and icon styles
- Creating buttons, input fields, and images
- Desktop and mobile Responsive layout finish up
A visually strong app, he said, does not just look good; it also feels solid and easy to use.
3. Developmental Stage
After the design is settled, it’s time to take your idea and turn it into a functional product. During the development stage, developers can code, build infrastructure, and establish connections between the frontend and backend. So this is step number one in the process of understanding how to create a web app from scratch.
From selecting the right tech stack to configuring a database, each decision affects speed, security, and scalability.
- Build the front-end
The frontend is visible to the user and interacts with them: buttons, forms, dashboards, animations, and such.
Developers make use of the following to construct this interface:
- HTML for page structure
- CSS for design and layout
- JavaScript for dynamic behavior
Nowadays, almost all the frontend frameworks like React, Vue, Angular, Svelte, and Next. JS lends itself to faster and more modular app creation. These tools help you implement scalable, maintainable, and responsive user experiences concurrently across multiple devices.
- Backend Development
The backend is the power underneath your app. It handles:
- Business logic
- User authentication
- Data processing
- Server-side functionality
Popular backend technologies include:
- Languages: Node. JS, Python, Ruby, PHP
- Frameworks: Express. JS, Django, Ruby on Rails, Laravel
This layer is on the server and makes sure that everything that exists in the frontend has a live system behind it.
- Integrate Frontend & Backend
The two ends are connected by means of API integration. APIs are kind of like messengers between your app’s frontend and backend.
To integrate them:
- Developers expose data through REST or GraphQL APIs
- We use tools like Axios (the fetch API) to send/receive data.
- Authors’ ORCIDs are added as auth tokens for each request
It is this integration that all of the real-time interactions occur, such as a user logging in, submitting a form, or fetching some user info.
- Create A Database
Any application that is storing data, users, products, and transactions requires a database of its own. It’s the memory of your app.
The database you use will depend on the type of data you are dealing with:
- Utilize SQL databases (such as MySQL, PostgreSQL) for the data stored in a relational model.
- Leverage NoSQL databases (MongoDB, Firebase) for semi-structured or sparse data
Once chosen, developers:
- Design the data schema
- Set up initial records
- Wire the DataBase to your backend logic.
- Test performance and optimize queries
Databases can be stored on relatively anywhere from your local machine to the cloud with AWS, Google Cloud, and Supabase as examples.
4. Testing & QA Stage
You must test your web app in detail before your web app goes live. This stage is aimed at finding any performance problems, usability holes, or security holes, before these are experienced by users.
The Testing and Bug Fixing phase makes sure the app performs flawlessly on the varied devices & conditions. Consider it as a last way to security check your work ahead of going live.
What Kind of Tests Should You Run for a Web App?
Here’s a breakdown of essential tests every web application should go through:
- Performance Testing
Why it matters: You want the app to load quickly and be reliable during peak demand.
Here, testers simulate high user activity/traffic to see how your app behaves under pressure. This includes load testing and stress testing to keep the platform robust.
- Functional Testing
Why it matters: Every form, button, login, or workflow should simply work.
Testers verify each feature with respect to the business and user perspective. For instance, does the “Submit” button even submit data? Is the login form returning when the wrong password is entered?
- Compatibility Testing
The bottom line: Your app needs to perform well on different browsers and devices.
This type of test will check that the web app works and looks as expected on Chrome, Firefox, Safari, mobile browsers, and various screen sizes. Cross-platform consistency is non-negotiable.
- Usability Testing
Why it matters: They’ll leave if users can’t quickly figure out how to use your app.
In this test, genuine users or UX professionals will use the app to determine how easy and how intuitive it is to navigate. They spot friction points for you to enhance the overall user journey.
5. Launch Phase
After your web app has been tested and is ready to release, it’s time for the final step, and the most thrilling one too: launch it! This step means that you’ve taken everything you’ve developed and made it available to your users inside a production environment.
The Launch Phase has two primary tasks: hosting and deployment. They’re both necessary to ensure the app is performant on the Web.
- Host the Web App
If you want to share your web app with the world, you will need to host it on a server.
The two biggest hosting options:
Cloud Hosting
Today, most web apps are hosted on a cloud provider (e.g., AWS, Google Cloud, Azure, or DigitalOcean). Developers choose a virtual machine (say EC2), or a container service (e.g, Docker) to create a hosting environment. Then, they upload the application files, define environment variables, and settings for performance.
On-Premise Hosting
Or you could host the app on your server. In this scenario, the operation team spins up physical or virtual machines, installs the software, such as Apache, Nginx, Node. js), upload the codebase, and link it to your domain by hand.
- Deploy the Web App
Deployment is the transition of your completed app version from development to live. That involves getting your code, database, and configurations from a version control system (such as Git) to your hosting server.
Here are a few popular deployment tools developers might use:
- CI/CD Tools: Jenkins, GitHub Actions, GitLab CI/CD
- Cloud Services: AWS Elastic Beanstalk, Heroku, Azure App Service
- Infrastructure Tools: Ansible, Terraform, Chef
Deployment also consists of automating the successful delivery so that there is as little downtime as possible, and new updates can be launched effectively.
FAQ
How is a web app different from a website?
Web apps are interactive and allow users to perform tasks, whereas websites are mostly informational and static.
What are the key phases of web app development?
The main phases are: Discovery & Ideation, UI/UX Design, Development, Testing & QA, and Launch.
Which technologies are commonly used for front-end and back-end?
Front-end: HTML, CSS, JavaScript, React, Vue.js; Back-end: Node.js, Python, Django, Ruby on Rails, PHP.
Why is testing important before launching a web app?
Testing ensures functionality, performance, compatibility, and usability are flawless, preventing user frustration or errors after launch.
How can I host and deploy my web app?
You can host on cloud platforms like AWS, Google Cloud, or Azure, and deploy using CI/CD tools like Jenkins, GitHub Actions, or Heroku.
Conclusion
Developing a web application is a path that combines strategy, creativity, and technological expertise; it begins with an idea and culminates in a valuable product. Each step is crucial to the overall success, from conceptualizing your app's core value and creating user-centered experiences to building a strong backend system, incorporating powerful APIs, testing rigorously, and finally, launching it to the public.

Whether you are creating an internal tool, a customer-facing system, or the next big thing, having a framework to follow step by step is key to making sure that your web app isn’t just “usable”—but provides real value while being high-performing, and ready for growth.


 Write us on:
  Business queries:
  HR:
HR: 


