
 Healthcare App Development Services
 Real Estate Web Development Services
 E-Commerce App Development Services
 E-Commerce Web Development Services
 Blockchain E-commerce Development Company
 Fintech App Development Services
 Fintech Web Development
 Blockchain Fintech Development Company
 E-Learning App Development Services
 Restaurant App Development Company
 Mobile Game Development Company
 Travel App Development Company
 Automotive Web Design
 AI Traffic Management System
 AI Inventory Management Software
 AI Development Company
  ChatGPT integration services
  AI Integration Services
  Generative AI Development Services
  Natural Language Processing Company
 Machine Learning Development
  Machine learning consulting services
  Blockchain Development
  Blockchain Software Development
  Smart Contract Development Company
  NFT Marketplace Development Services
  Asset Tokenization Company
 DeFi Wallet Development Company
 Mobile App Development
  IOS App Development
  Android App Development
  Cross-Platform App Development
  Augmented Reality (AR) App Development
  Virtual Reality (VR) App Development
  Web App Development
  SaaS App Development
 Flutter
  React Native
  Swift (IOS)
  Kotlin (Android)
  Mean Stack Development
  AngularJS Development
  MongoDB Development
  Nodejs Development
  Database Development
 Ruby on Rails Development
 Expressjs Development
  Full Stack Development
  Web Development Services
  Laravel Development
  LAMP Development
  Custom PHP Development
  .Net Development
  User Experience Design Services
  User Interface Design Services
  Automated Testing
  Manual Testing
  Digital Marketing Services
 Ride-Sharing And Taxi Services
 Food Delivery Services
 Grocery Delivery Services
 Transportation And Logistics
 Car Wash App
 Home Services App
 ERP Development Services
 CMS Development Services
 LMS Development
 CRM Development
 DevOps Development Services
 AI Business Solutions
 AI Cloud Solutions
 AI Chatbot Development
 API Development
 Blockchain Product Development
 Cryptocurrency Wallet Development
 About Talentelgia
  Our Team
  Our Culture
 Healthcare App Development Services
 Real Estate Web Development Services
 E-Commerce App Development Services
 E-Commerce Web Development Services
 Blockchain E-commerce
Development Company
Blockchain E-commerce
Development Company Fintech App Development Services
 Finance Web Development
 Blockchain Fintech
Development Company
Blockchain Fintech
Development Company E-Learning App Development Services
 Restaurant App Development Company
 Mobile Game Development Company
 Travel App Development Company
 Automotive Web Design
 AI Traffic Management System
 AI Inventory Management Software
 AI Development Company
 ChatGPT integration services
 AI Integration Services
 Machine Learning Development
 Machine learning consulting services
 Blockchain Development
 Blockchain Software Development
 Smart contract development company
 NFT marketplace development services
 IOS App Development
 Android App Development
 Cross-Platform App Development
 Augmented Reality (AR) App
Development
Augmented Reality (AR) App
Development Virtual Reality (VR) App Development
 Web App Development
 Flutter
 React
Native
React
Native Swift
(IOS)
Swift
(IOS) Kotlin (Android)
 MEAN Stack Development
 AngularJS Development
 MongoDB Development
 Nodejs Development
 Database development services
 Ruby on Rails Development services
 Expressjs Development
 Full Stack Development
 Web Development Services
 Laravel Development
 LAMP
Development
LAMP
Development Custom PHP Development
 User Experience Design Services
 User Interface Design Services
 Automated Testing
 Manual
Testing
Manual
Testing About Talentelgia
 Our Team
 Our Culture
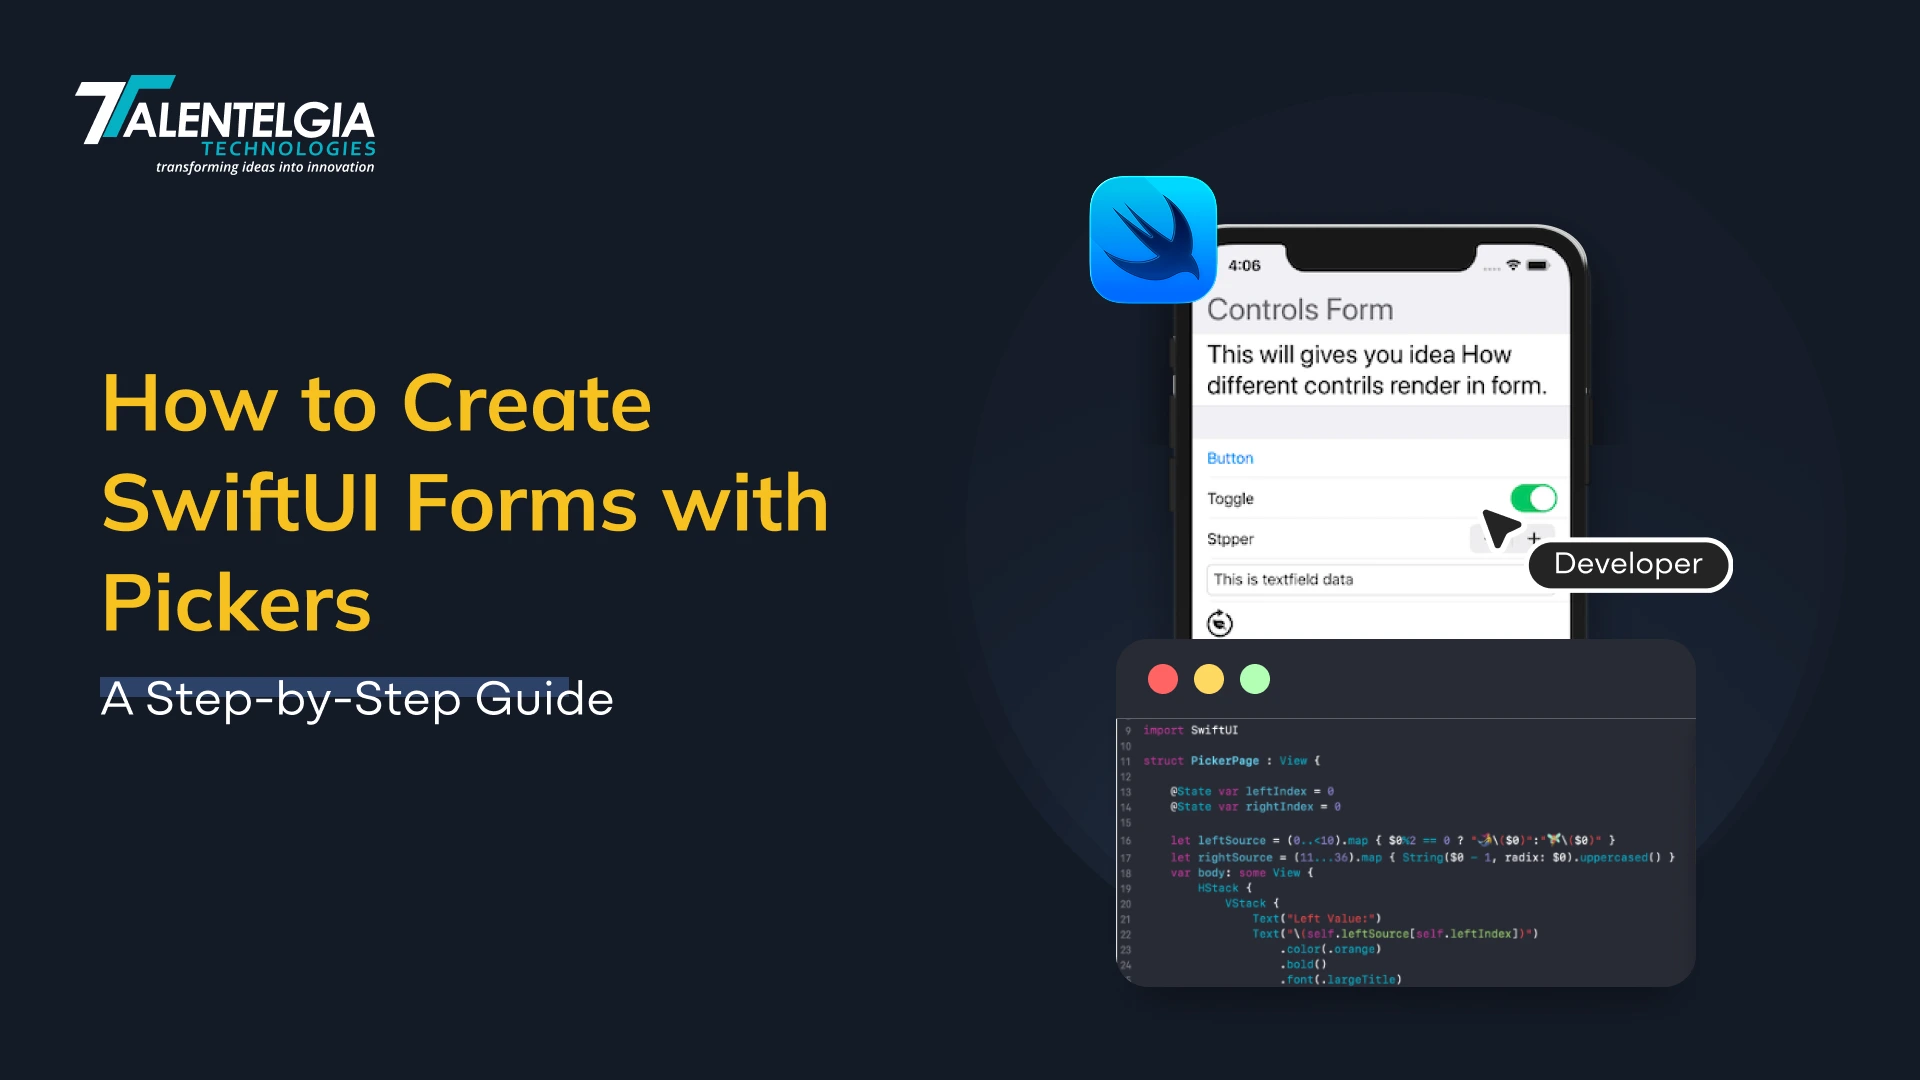
When working with SwiftUI, the Picker is one of the most versatile and frequently used components for selecting values from a list. Whether it’s choosing from a set of categories, selecting a date, or toggling between options, Pickers give users a clean, native interface for input. But building a Picker isn’t just about displaying options—it’s about making the app respond to the user’s choice.
That’s where attaching actions to the Picker becomes essential. In this blog, we’ll explore how to trigger actions when a selection changes in SwiftUI, covering best practices, code examples, and scenarios where Pickers can enhance both functionality and user experience.
What Is A SwiftUI Form?
SwiftUI Forms are container views specifically made to hold input controls and display them in a structured, easy-to-read manner – much like the ones you see in Settings apps of iOS.If you are learning how to design a mobile app interface, using SwiftUI Forms can be a great starting point. By embedding TextFields, Toggles, Pickers, and Sliders within a Form, SwiftUI automatically styles them in ways that are optimized for the platform. Spacing and grouping are automatically handled, ensuring your UI remains consistent with native iOS design standards. This saves development time and provides a responsive, accessible, intuitive user experience without the need for complicated custom styling.
Step-by-Step Guide To Create A SwiftUI Form With Pickers
SwiftUI makes it simple to build clean, user-friendly forms with built-in elements like TextFields, Toggles, Buttons, and Pickers. Let’s walk through creating a Contact Form that includes a picker for selecting a subject.
Step 1: Create a New SwiftUI Project

- Open Xcode → choose iOS → App.
- Name it Travel Feedback.
- Select:
- Interface: SwiftUI
- Life Cycle: SwiftUI App
- Language: Swift
- Interface: SwiftUI
- Now you have a blank SwiftUI app.
Step 2: Add a Simple Form
Replace the default code with this:
struct ContentView: View {
    var body: some View {
        Form {
            Text("Travel Feedback Form")
        }
    }
}
Run it. You’ll see a very simple form with one line of text.
Step 3: Let People Type Their Info
We’ll add boxes where the user can enter their name, email, and comments.
struct ContentView: View {
    @State private var name = ""
    @State private var email = ""
    @State private var comments = ""
    var body: some View {
        Form {
            TextField("Your Name", text: $name)
            TextField("Your Email", text: $email)
                .keyboardType(.emailAddress)
            TextEditor(text: $comments)
                .frame(height: 80)
        }
    }
}
Try typing in the fields. Notice how the text changes live; that’s because of @State.
Step 4: Group Inputs into Sections
Forms look cleaner when we separate info into parts.
Form {

    Section(header: Text("Traveler Info")) {
        TextField("Your Name", text: $name)
        TextField("Your Email", text: $email)
            .keyboardType(.emailAddress)
    }
    Section(header: Text("Your Feedback")) {
        TextEditor(text: $comments)
            .frame(height: 80)
    }
}
Now your form has headers like “Traveler Info” and “Your Feedback.”
Step 5: Add a Picker (Dropdown)
We’ll let the user choose their favorite destination from a list.
@State private var destination = "Paris"

let destinations = ["Paris", "New York", "Tokyo", "Sydney", "Cape Town"]
Section(header: Text("Favorite Destination")) {
    Picker("Select Destination", selection: $destination) {
        ForEach(destinations, id: \.self) {
            Text($0)
        }
    }
}
Run it. You’ll see a dropdown with city names.
Step 6: Make It Look Like an App
Wrapping the form in a NavigationView gives it a title bar.
@State private var destination = "Paris"
NavigationView {
    Form {
        Section(header: Text("Favorite Destination")) {
            Picker("Select Destination", selection: $destination) {
                ForEach(destinations, id: \.self) {
                    Text($0)
                }
            }
        }
    }
    .navigationTitle("Travel Feedback")
}
Now it looks like a proper iPhone app screen.
Step 7: Add a Rating with Buttons
We’ll ask users to rate their trip using a segmented control (buttons side by side).
enum Experience: String, CaseIterable {
case poor = "Poor", average = "Average", good = "Good", excellent = "Excellent"
}

@State private var experience = Experience.good
Section(header: Text("Rate Your Trip")) {
Picker("Experience", selection: $experience)
{
  ForEach(Experience.allCases, id: .self) { option in
  Text(option.rawValue)
     }
}
.pickerStyle(SegmentedPickerStyle())
}
Now users can tap Poor / Average / Good / Excellent.
Step 8: Add a Submit Button
Finally, let’s add a button that shows the data in the console (you’ll see it in Xcode’s output).
Section {
        Button("Submit Feedback") {
            print("Name: name)")
            print("Email: \(email)”)
            print (“Destination: \(destination)”)
            print(“Experience: \(experienxe.rawValue)”)
            print(“comments: \(comments)”)
         }
}
Run it, fill the form, then press “Submit Feedback.”
Final Result
You just built a Travel Feedback Form with:
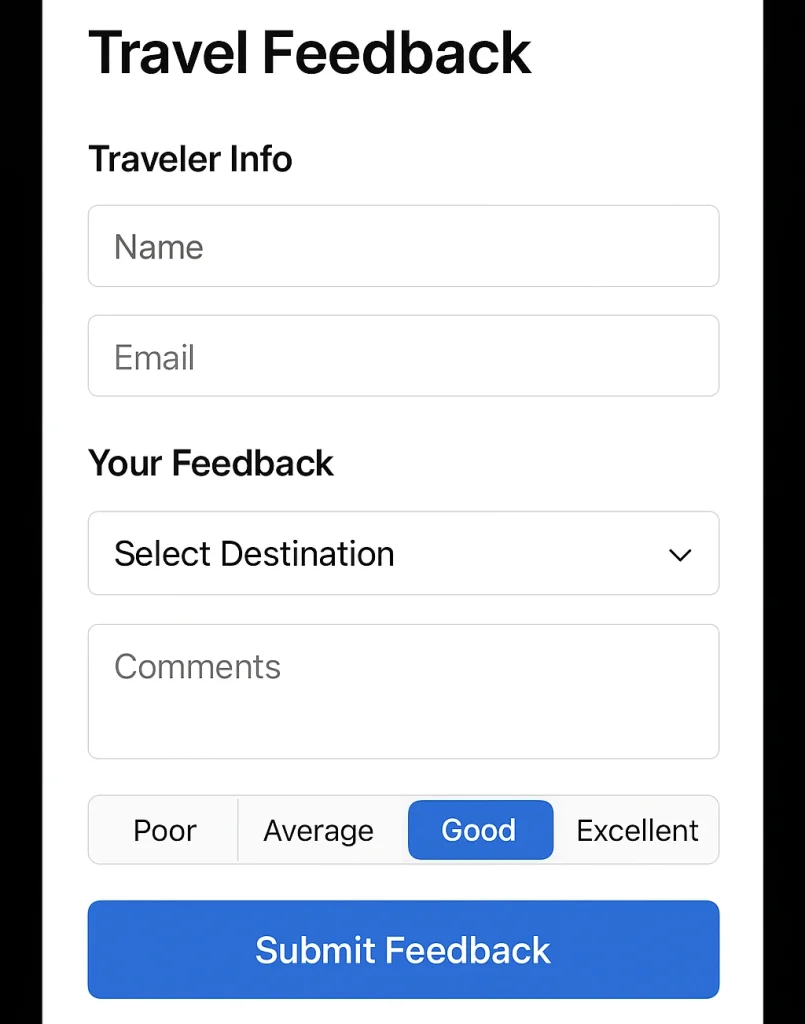
- Text fields for name & email
- A text box for comments
- A picker for destinations
- Segmented buttons for rating
- A submit button
Also Read: Technologies to Develop Mobile Apps
Conclusion
In conclusion, creating forms in SwiftUI is both simple and powerful, allowing you to capture inputs, organize sections, and enhance usability with pickers and custom controls. By following this beginner-friendly walkthrough, you’ve seen how even a small project can bring together essential elements of interactivity and design. Whether you’re building a feedback form, a survey, or a registration page, this guide to making a SwiftUI form with pickers equips you with the foundation to expand and customize your app ideas with confidence.


 Write us on:
  Business queries:
  HR:
HR: 


