
 Healthcare App Development Services
 Real Estate Web Development Services
 E-Commerce App Development Services
 E-Commerce Web Development Services
 Blockchain E-commerce Development Company
 Fintech App Development Services
 Fintech Web Development
 Blockchain Fintech Development Company
 E-Learning App Development Services
 Restaurant App Development Company
 Mobile Game Development Company
 Travel App Development Company
 Automotive Web Design
 AI Traffic Management System
 AI Inventory Management Software
 AI Software Development
  AI Development Company
  AI App Development Services
  ChatGPT integration services
  AI Integration Services
  Generative AI Development Services
  Natural Language Processing Company
 Machine Learning Development
  Machine learning consulting services
  Blockchain Development
  Blockchain Software Development
  Smart Contract Development Company
  NFT Marketplace Development Services
  Asset Tokenization Company
 DeFi Wallet Development Company
 Mobile App Development
  IOS App Development
  Android App Development
  Cross-Platform App Development
  Augmented Reality (AR) App Development
  Virtual Reality (VR) App Development
  Web App Development
  SaaS App Development
 Flutter
  React Native
  Swift (IOS)
  Kotlin (Android)
  Mean Stack Development
  AngularJS Development
  MongoDB Development
  Nodejs Development
  Database Development
 Ruby on Rails Development
 Expressjs Development
  Full Stack Development
  Web Development Services
  Laravel Development
  LAMP Development
  Custom PHP Development
  .Net Development
  User Experience Design Services
  User Interface Design Services
  Automated Testing
  Manual Testing
  Digital Marketing Services
 Ride-Sharing And Taxi Services
 Food Delivery Services
 Grocery Delivery Services
 Transportation And Logistics
 Car Wash App
 Home Services App
 ERP Development Services
 CMS Development Services
 LMS Development
 CRM Development
 DevOps Development Services
 AI Business Solutions
 AI Cloud Solutions
 AI Chatbot Development
 API Development
 Blockchain Product Development
 Cryptocurrency Wallet Development
 About Talentelgia
  Our Team
  Our Culture
 Healthcare App Development Services
 Real Estate Web Development Services
 E-Commerce App Development Services
 E-Commerce Web Development Services
 Blockchain E-commerce
Development Company
Blockchain E-commerce
Development Company Fintech App Development Services
 Finance Web Development
 Blockchain Fintech
Development Company
Blockchain Fintech
Development Company E-Learning App Development Services
 Restaurant App Development Company
 Mobile Game Development Company
 Travel App Development Company
 Automotive Web Design
 AI Traffic Management System
 AI Inventory Management Software
 AI Software Development
 AI Development Company
 ChatGPT integration services
 AI Integration Services
 Machine Learning Development
 Machine learning consulting services
 Blockchain Development
 Blockchain Software Development
 Smart contract development company
 NFT marketplace development services
 IOS App Development
 Android App Development
 Cross-Platform App Development
 Augmented Reality (AR) App
Development
Augmented Reality (AR) App
Development Virtual Reality (VR) App Development
 Web App Development
 Flutter
 React
Native
React
Native Swift
(IOS)
Swift
(IOS) Kotlin (Android)
 MEAN Stack Development
 AngularJS Development
 MongoDB Development
 Nodejs Development
 Database development services
 Ruby on Rails Development services
 Expressjs Development
 Full Stack Development
 Web Development Services
 Laravel Development
 LAMP
Development
LAMP
Development Custom PHP Development
 User Experience Design Services
 User Interface Design Services
 Automated Testing
 Manual
Testing
Manual
Testing About Talentelgia
 Our Team
 Our Culture
Imagine if you could create a real Android app without any coding whatsoever.
Welcome to the future of app building — AI does the heavy lifting, and you copy, paste, and deploy.
In this tutorial, we’ll walk you through how to create an Android app that fetches real-time stock market data for 50 popular companies using only ChatGPT’s instructions and code. No programming experience before that? No problem. We’ll count on ChatGPT to produce all the lines of code and lead all the steps for us, from installing Android Studio to calling real APIs and displaying data beautifully.
Whether you’re a curious beginner, a non-coder dabbling in AI-assisted development, or a techie pushing the limits of generative AI, you’ll see in this hands-on experiment just how powerful and practical ChatGPT has become as a tool for app creation.
Let’s put it to the test.
Steps To Create An App Using ChatGPT
Now that we’ve set the stage, let’s dive into the actual development process. Below is a clear, copy-paste-friendly walkthrough of how you can build your stock market app — using nothing but ChatGPT and Android Studio.
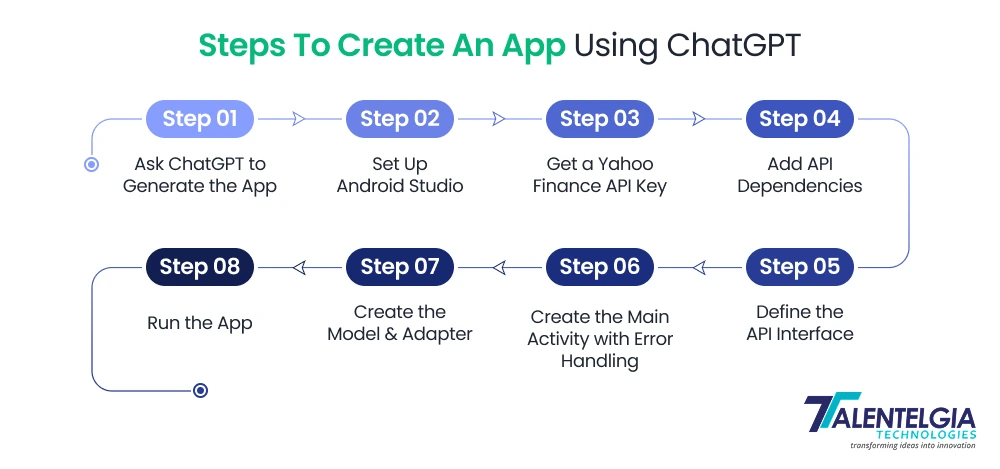
Step 1: Ask ChatGPT to Generate the App
Use this prompt:
“I want to build a simple Android app that shows real-time stock prices for 50 popular shares using the Yahoo Finance API. Please guide me step-by-step and provide copy-paste-ready code for Android Studio.”
Step 2: Set Up Android Studio
Follow ChatGPT’s instructions to:
- Download and install Android Studio.
- Create a New Android Project using “Empty Activity”.
- Name your project (e.g., StockTrackerApp).
- Choose Kotlin or Java (ChatGPT can work with both — Java was used in our example).
Wait for the Gradle build to complete.
Step 3: Get a Yahoo Finance API Key
- Go to RapidAPI Yahoo Finance
- Sign up and subscribe to the free tier.
- Copy your X-RapidAPI-Key — you’ll need it soon.
Step 4: Add API Dependencies
Open build. gradle (Module) and add:

dependencies {

    implementation 'com.squareup.retrofit2:retrofit:2.9.0'

    implementation 'com.squareup.retrofit2:converter-gson:2.9.0'

}
Sync your project.
Step 5: Define the API Interface
Create a new Java file called YahooFinanceAPI.java and paste this code:
java

import retrofit2.Call;

import retrofit2.http.GET;

import retrofit2.http.Headers;

import retrofit2.http.Query;

public interface YahooFinanceAPI {

    String BASE_URL = "https://yahoo-finance15.p.rapidapi.com/";

    @Headers({

        "X-RapidAPI-Host: yahoo-finance15.p.rapidapi.com",

        "X-RapidAPI-Key: YOUR_API_KEY_HERE"

    })

    @GET("api/yahoo/qu/quote/AAPL,GOOG,MSFT")

    Call<StockResponse> getStockPrices();

}
Replace “YOUR_API_KEY_HERE” with your actual key.
Step 6: Create the Main Activity with Error Handling
Now create your MainActivity.java:
java

import android.os.Bundle;

import android.widget.Toast;

import androidx.appcompat.app.AppCompatActivity;

import androidx.recyclerview.widget.LinearLayoutManager;

import androidx.recyclerview.widget.RecyclerView;

import java.util.ArrayList;

import java.util.List;

import retrofit2.*;

import retrofit2.converter.gson.GsonConverterFactory;

public class MainActivity extends AppCompatActivity {

    private RecyclerView recyclerView;

    private StockAdapter adapter;

    private List<Stock> stockList;

    @Override

    protected void onCreate(Bundle savedInstanceState) {

        super.onCreate(savedInstanceState);

        setContentView(R.layout.activity_main);

        recyclerView = findViewById(R.id.recycler_view);

        stockList = new ArrayList<>();

        adapter = new StockAdapter(this, stockList);

        recyclerView.setLayoutManager(new LinearLayoutManager(this));

        recyclerView.setAdapter(adapter);

        Retrofit retrofit = new Retrofit.Builder()

                .baseUrl(YahooFinanceAPI.BASE_URL)

                .addConverterFactory(GsonConverterFactory.create())

                .build();

        YahooFinanceAPI api = retrofit.create(YahooFinanceAPI.class);

        Call<StockResponse> call = api.getStockPrices();

        call.enqueue(new Callback<StockResponse>() {

            @Override

            public void onResponse(Call<StockResponse> call, Response<StockResponse> response) {

                if (response.isSuccessful() && response.body() != null) {

                    stockList.clear();

                    stockList.addAll(response.body().getStocks());

                    adapter.notifyDataSetChanged();

                } else {

                    Toast.makeText(MainActivity.this, "Error fetching stock data", Toast.LENGTH_LONG).show();

                }

            }

            @Override

            public void onFailure(Call<StockResponse> call, Throwable t) {

                Toast.makeText(MainActivity.this, "Network error: " + t.getMessage(), Toast.LENGTH_LONG).show();

            }

        });

    }

}
Step 7: Create the Model & Adapter
Ask ChatGPT:
“Can you generate the Stock, StockResponse, and StockAdapter classes for a RecyclerView in Android using Java?”
Copy the generated classes into your app:
- Stock.java – contains symbol, price, and company name
- StockResponse.java – handles the API response
- StockAdapter.java – displays each stock item in the list
Step 8: Run the App
- Click Run in Android Studio
- Use an emulator or a physical device
- Your app should now display a scrollable list of stock names and prices!
Debugging? Ask ChatGPT
If the app crashes or data isn’t showing:
- Ask ChatGPT something like:
“I’m getting a null pointer error when fetching stock data. Can you help me fix it?”
ChatGPT will review and offer line-by-line fixes.
Conclusion
And there you have it — a fully functional, real-time stock tracking Android app built without writing a single line of code yourself. This project not only showcases how powerful ChatGPT has become as a coding assistant but also proves that with the right prompts and tools, anyone can turn their app ideas into reality — no technical background required. Whether you're a hobbyist, entrepreneur, or curious learner, this hands-on experience is just the beginning of what AI-powered development can help you create. The future of app building is here — intuitive, accessible, and powered by AI.


 Write us on:
  Business queries:
  HR:
HR: 


